
You have heard, I am sure, that content is king. And of course it’s important to have good content that provides value to your listeners and your business. But it’s also important to have good sounding audio. Podcasting has been around for nearly two decades now, and the expectation of pleasant, easy-to-listen to audio quality is well established.
There are two main factors in optimizing your audio quality:
- The tools you use to capture it.
- The room you’re capturing it in.
Choosing the Right Mic
We’ll start with tools.
Your mic is going to make the biggest impact on your sound, and you should invest in the best one that is feasible for you, but how you use your mic is always going to trump how many dollars you spend on it.
Some solid brands are Shure, Blue, Audio Technica, and Rode. I used to record on a Blue Yeti, but have upgraded to a Shure X2u and am very pleased with the quality.
A few things about mics. All of the brands I listed have USB and XLR versions. XLR is, without getting too technical about it, a different input/output system to connect it to your computer – if you choose an XLR mic, you will also need to buy a converter. USB mics connect directly to your computer via a USB cable. If the thought of finding and using a converter gives you the screaming mimi’s, just go for a USB mic. They are higher quality and capture better sound, but the difference isn’t so huge that you need to sacrifice ease and comfort for it.
Finally, all things being equal, choose a dynamic mic, and not a condenser. Dynamic mics are better at picking up your voice and not your neighbor’s leaf blower (although there is only so much that can be done with a neighbor’s leaf blower). Basically, dynamic mics are better in less-than ideal environments, and condensers are better in a studio.
But none of that is more important than proper mic technique! The first thing you should do when you get your new mic is head over to Youtube and type in: How to use [MY NEW MIC]. Enter the brand name and model specifically and dollars to donuts you will find multiple videos of delightful gearheads explaining how to configure the settings and get the best sound out of the machine.
I’m not going to go into any more specifics about that because the specific recommendations for each mic are different and those gearheads are truly, down to-their-bones passionate about them and will have the best advice.
In a pinch, you can record a podcast episode using a standard headset and mic combo. It won’t sound great, but it will be better than nothing or your computer audio.
Under no circumstances should you ever, EVER record using webcam or computer microphones. If it came with your laptop, don’t use it to record audio.
Here is a little demonstration of raw audio I captured using the native computer mic, my headset mic, and my actual, good quality one.
You can really hear the difference, right? Get a standalone mic that was made for just audio capture, and use headphones to make sure you are only going to be recording the sounds you want to be.
Headphones
A quick note on headphones: It is absolutely critical to use a headset while you are recording audio. You don’t want to be picking up any sounds from speakers in your mic; the resultant noise is… bad. For recording purposes, it doesn’t really matter what kind of headphones you use – it can be a big fancy over the ears set, it can be earbuds. As long as the sound coming out of your computer is going directly into your ears and not into your recording room you’re golden.
There are professional podcasting headsets out there, but for most company shows, I think they are overkill. If you’re not producing the audio yourself, you don’t need to hear every nuance of every note of audio, don’t worry about it.
Now, let’s talk about the software you’re going to use to record your episodes.
Using the Right Recording Software
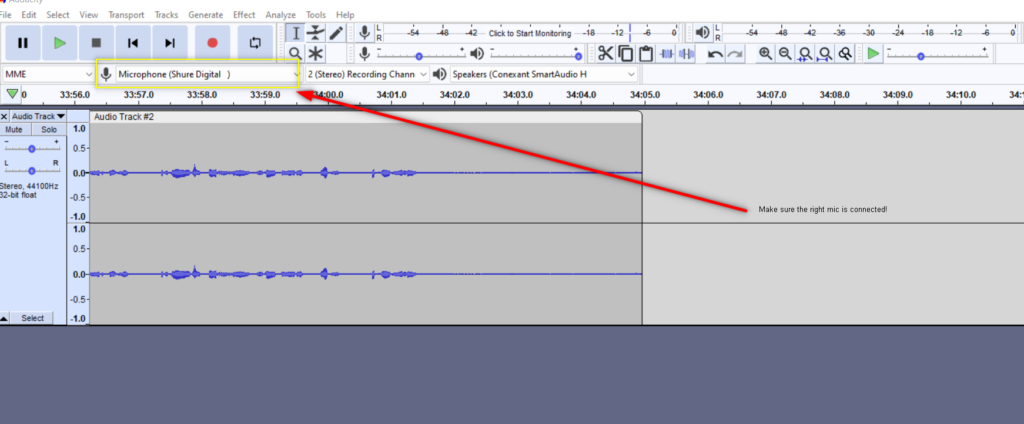
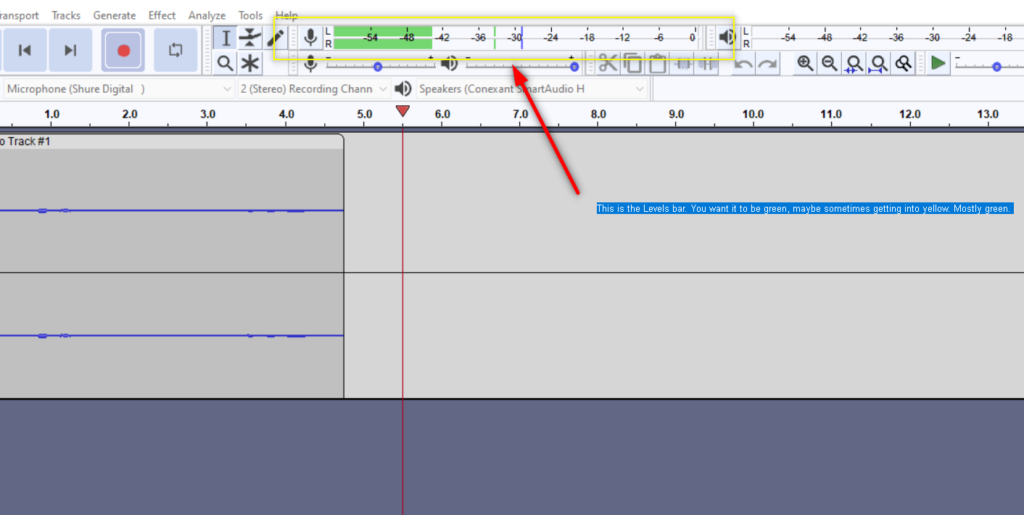
When you’re recording solo, you can use a free tool like Audacity or Garageband to get quite good quality audio. They are programs designed to capture sound from microphone inputs and after getting used to the basic settings, are easy to use. The most important thing is to make sure you have the right mic selected, and that your ‘levels – you’ll see a little bar graph that goes from green to yellow to red’ stays mostly in the green, and never gets too far into yellow.)
Recording with Others
You can record using zoom if that is what you and your guests are most comfortable with, but there is going to be some audio-quality loss. It was designed for video calls, not for pristine audio-capture and it just doesn’t get the whole spectrum of sound. If you are going to use zoom, make sure that you have your room set to record each speaker on a separate track – that is going to give you a lot more wiggle room in editing!
There are many podcast-specific platforms out there – Squadcast, Zencastr, Riverside among others. They are designed to capture good quality podcast audio, if it’s possible to use one of them, we always recommend it.
Do not record in your phone, or GoogleMeet or GotToMeeting or Microsoft Teams unless you have absolutely no other options.
So those are the basics of getting a good mic and recording it using the proper software.
And you can follow every piece of advice with an awesome quality mic and premium podcast recording software and still sound like you’re recording from your bathtub. I’m sorry.
But the recording practice and environment matters too – so let’s talk about that next.
Your Podcast Recording Environment
Good recording means good behavior while you’re recording and making sure your recording space is as optimized as possible for capturing high quality sound.
Behavior is all about how you set yourself up to create good audio – and how you advise and encourage your guests to do so.
There is a little bit of pre-recording ‘hygiene’ you’ll want to do before you press play.
Pre-Recording Checklist
- Make sure your chair does not squeak
- Turn off any fans, heating or AC that you can control.
- Ensure pets, children and spouses are quiet.
- Make sure your clothes, jewelry and hair do not rustle, or bump the mic.
- Do not type while recording.
- Do not rustle papers while recording.
- When the delivery person inevitably reigns your doorbell during a recording, pause, and pick up where you left off.
- Close windows and blinds.
- Try to avoid milk-based drinks before recording, they make your voice a little mucosy.
- DO drink lemon water! Lemon is great for clearing out your throat.
- DO always confirm your recording platform has the right mic selected
- DO always test your sound to make sure.
If you are the host – do the same for your guest. It is absolutely acceptable to provide advice in advance about how to record (especially if they are not regular podcast guests!) and to give feedback while you are on the call. You’re the boss of your podcast, and you get to have a say in the quality of your guests audio. To an extent.
You’re not really going to be able to fix their room if they aren’t in a great one – but you can probably alter your own – so lets talk about how to optimize it.
Leveling Up your Sound Quality
Let’s talk about soundwaves.
Picture a pool table and the way a ball bounces around the various angles and corners. That ball represents sound, and the table is the room you’re recording in. To get great audio, your goal is to keep the ball from bouncing as much as possible. If you place pillows in strategic areas on the pool table – the ball ceases to bounce!
It’s the same with sound. When sound waves hit something like acoustic foam – or a pillow, they cannot bounce like they would off a flat surface, which prevents those weird reverb and echoey recordings you can often get in an office. This is the basis for acoustic treatment.
Here’s what causes bad audio:
- Hard flooring
- Untreated glass windows
- Large, empty walls
- Naked corners
- Noisy neighbors
Of course, if you look around most modern offices, and many tastefully decorated home environments, you might just see a lot of hard flooring, glass windows, large minimalist walls, and naked corners. Whether you have noisy neighbors or not is pure luck of the draw.
Let’s talk about how to choose a great room.
The higher quality acoustics you can start with, the better off you’ll be in the long run. You won’t just cut down on the work it takes to be recording ready, you’ll also save money on the supplies to do it. If you have the option of choosing your recording space, look for an isolated area away from people, machines, and ambient noise. You want to eliminate these noise sources early because we have no control over them: printers, plumbing, birds, traffic, construction, hallway hijinks… If you can hear it, your microphone probably will, too.
Next, consider the permanent aspects of the room, which includes flooring and windows. The biggest problem area is flooring. If you have carpet, you’re golden. If you are allowed to put a rug on the floor to cover most of the hardwood or tile, that works, too. In a pinch, grab a blanket and spread it out while you’re recording. If the windows are large, then you’ll need curtains to keep sound from bouncing off them.
A very large room with a very high ceiling is also going to be a challenge. If there is a small, carpeted room to use – try to record there. Sometimes we have to work with what we’ve got however. If your business has an acoustically treated conference room or similar, you can record at home in your carpeted bedroom with the curtains drawn amazing! If not, do the best with what you have, and if that isn’t very good, you can think about renting studio space for your recordings – there are podcast studios in most major cities, and many smaller ones!
For a little spot test – walk around the room you want to record in clapping your hands loudly. If you hear a lot of echo, or a harsh ringing, your vocals probably won’t sound very good if you record in there. If you hear a gentler, more pleasant reverb – great! Your voice won’t be as loud as your clapping, so you will be able to capture a nice, natural sound.
If you’re not wholly satisfied with how your room sounds right now, then you need some acoustic treatment.
Acoustic Treatment
Many rooms are square, which means the first problem area you need to address are those naked tri-corners. Tri-corners are where three walls converge, including ceiling and floor. This is the single biggest, and most often overlooked issue. The solution is bass traps.
Bass traps are large, foam wedges that fit neatly in 90-degree room corners. Without getting too technical, bass traps do what the name implies: they absorb low bass frequencies in addition to mid and high frequencies. Typically, these are glued to the walls using specialized, heavy duty, spray-on glue. (Or 3M picture hanging strips!)
Bass traps come in many lengths and sizes. In a mid-sized, square room, you’d install one in each tri-corner, totaling eight. From there, you want to focus on bi-corners (where two walls meet) with priority on what’s right at head-level. An important note: often, room furnishings and decorations block the bottom tri- and bi-corners of a room. If this is the case, there’s no need for a bass trap there.
Next – big empty walls. Acoustic panels are used to break up large, empty spaces on walls. Here’s a good rule of thumb for installation. The closer the wall is to you, the more coverage you want.
For example, if the wall is very close to your microphone, then you’ll want to create a seamless barrier of panels, one right next to the other. On the other hand, for a wall that is a few yards behind you, you can create a pattern with gaps between panels.
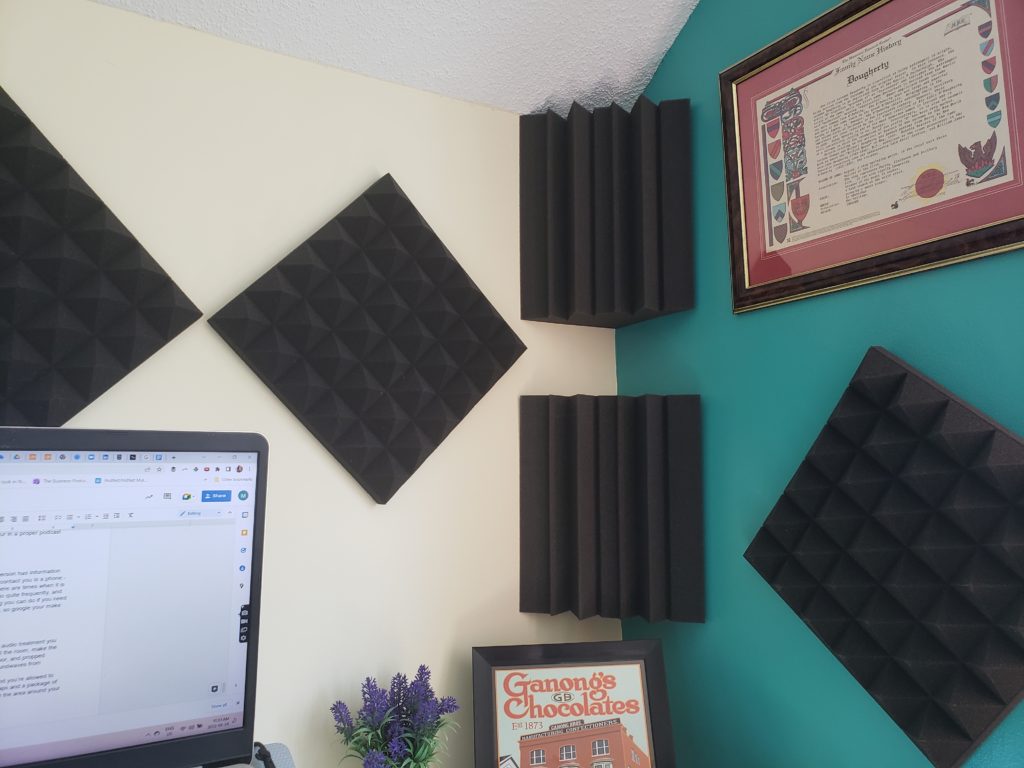
This is the corner my desk is against. Two base traps and panels on the open space improve the quality of recording.
In addition to small acoustic panels, you can also use larger, wall-mounted panels. They are rectangular with a few inches’ thickness and hang like a large painting. They come in all colors and can even feature your favorite art. They are typically more expensive than regular foam acoustic panels, however.
For less permanent alterations to the space, that can do double duty for both audio and video: get a muslin backdrop that photographers and videographers use. Muslin is often used for greenscreen footage, and when you have multiple layers of it, it works as pretty decent sound absorption if it’s not directly against a wall. This is a fantastic addition if you also want a backdrop for videos or calls.
You can buy all-in-one sets that include a frame you can break down to nearly nothing and several sheets of muslin in different colors or prints. Remember: thicker is better as long as the frame can handle the weight.
Next, an extra layer of protection for your microphone is always a good idea. A reflection filter is a small shield that goes right behind your microphone, usually less than a foot tall and a few feet wide. It can be mounted on a stand or set on a desk, depending on your setup. The reflection filter will shield the back of the microphone while your body shields the front.
Finally, if the room you’re using has hardwood or tile floors – basically anything flat – then you’ll want to have some sort of covering to go over it. It can be a rug or a bed comforter; just stop the sound from bouncing. Rugs can be rolled up and blankets can be folded to store when not in use.
All of this can mean that you have to do a little setup and takedown when it’s time to record – and that can be a little bit of a hassle. You’ll have to decide if the hassle, or adding some more permanen treatments to your space is the best option. You can also decide “what I have is good enough for the show I’m recording and the purposes I am using it for” and just let the matter lie.
Question: How should I Record Live in a Room with Another Human?
Unless you are doing it in a studio, or you have an in-house expert who can set you up with lav mics and popper studio recording equipment, try to avoid this. For large scale, professional podcasts live recording can be fantastic. For the vast majority of business shows it’s not worth the effort and expense to do it well, and doing it poorly sounds pretty lousy. The difficulty with recording live in a room with other people is that without proper protections it’s really easy for your mic to pick of their voice, and there will be multiple voices bouncing around the room causing echo and reverb. It can be an editing nightmare with a pretty limited best-case result. It is often much better to have each speaker in their own room, or at their own desk, recording separately, so they can control their own audio and the room it’s in as much as possible.
If you really want to have a live, face-to-face conversation, book an hour in a proper podcast studio! And each guest *must* have their own mic.
Question: What if my guest can only phone in?
When you really want to speak to a specific person, or that person has information you really want to share with your audience and the only way they can contact you is a phone – then sure, record the phone call and use that audio. It’s not ideal, but there are times when it is your best option, and the show must go on. You do hear this on the radio quite frequently, and on some pretty big name podcasts, so while it’s not ideal, it is something you can do if you need to. Use a specific phone-voice recorder – most mobile phones have one, so google your make and model and “how to record phone calls.”
Action Step for the Week
Your Action Step for this week is to take a good, hard listen to your raw audio. How is it? Is it clear and natural sounding? If not, it’s time to do a little troubleshooting to see what you can improve.
- What mic are you using? If it’s not a standalone one – consider upgrading.
- Are you using headphones while you record? If not – start.
- What are you recording into? Maybe it’s time to switch to a professional podcast recording service.
- Is your room treated for audio? Clap your hands and listen to the sound – is it metallic or echoey? Treat your room either with sound panels and bass traps, or with curtains, rugs and throw blankets.
- Try again and see if you can hear any improvements!
Links and Resources
One Stone Creative | LinkedIn | Twitter | Facebook | Instagram | Contact